Affilate Marketing
All Things Printing
Business Resources
CRMs and Systems
Marketing
Tips & Tricks
Hi, I'm Laney!
I make wedding invitations and I teach artists how to work smarter, make money, and run a business that works for you.
We'd love to have you join us - signup for our email list to get DBL updates, stationery design tricks, business tips and more!
Happy New Year everyone! Have you enjoyed seeing all the baby announcements and engagements on your news feed this week? I have been SO EXCITED – this year is all about the babies for my friends and colleagues it seems, and what a fun time that is! If you’re part of that newly-engaged crew, then we hope you check out the entire All About Series starting with All About Wedding Invites. These will tell you all you need to know about each piece of a wedding invitation suite, and today we’re going to chat about a favorite upgrade of mine – envelope liners.
What are Envelope Liners?
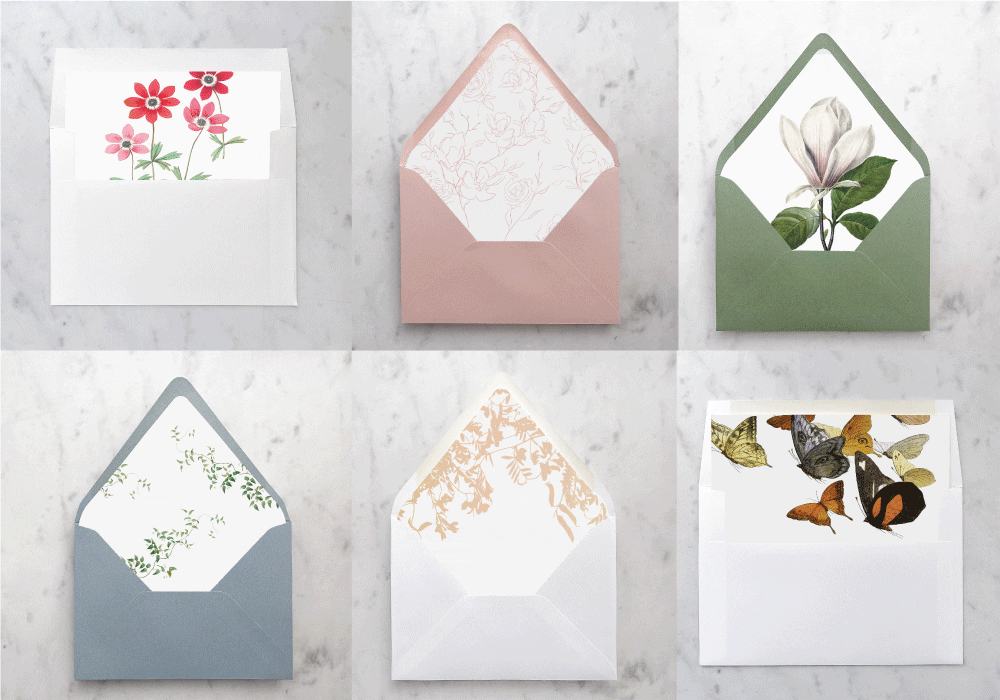
Envelope liners are that pretty piece of paper that’s glued inside the flap of your envelopes – you may not have seen them before in real life, since they’re not common in everyday mail. But they’re becoming increasingly popular for invitations as a fun upgrade that isn’t incredibly costly.
Envelope liners originated because they help protect your invitations from any damage they may incur in the mail. They provide an extra layer between the envelope and the invitation as well, in case your colored envelopes start to rub off on the invites themselves. Plus, they can add an extra pop of fun when your guests start opening your invitations!
Do you Need an Envelope Liner?
We always recommend envelope liners if the invitation pieces are white, especially cotton, and the envelopes are colored, especially black. Otherwise, they aren’t a pure necessity, but we will say they’re our number one favorite upgrade – above gold foil, vintage stamps, even calligraphy! You could say we’re on #teamliner for life.
How to Design an Envelope Liner?
Envelope liners are usually a simple design, and they can make a huge impact on your overall suite. It’s a place to play with any design elements that you maybe weren’t able to play with on the other pieces. We recommend keeping it fairly simple, with a repeating pattern or some simple shapes, so it adds to your suite rather than taking away from it or overpowering it. There’s a lot of space to cover with an envelope liner, but you don’t necessarily need to use huge design elements (unless that’s your vision!).
Make sure you take into account the shape of your envelope flap when designing your liners. If you have a square flap, you’ll want a different design than if you have a Euro (pointed) flap. Euro flaps (and square flaps) also come in different sizes and shapes within that same category. For instance, it’s somewhat tough to make a “square” design in an envelope liner, because pointed flaps are usually more angled than you think, and even though square flaps are called square flaps, they’re more irregular than that too.

One last thing to consider – the envelope liner can get torn when your guests are opening the envelopes, so if you put a design right in the middle of the crease, this may compromise your design. That’s why we prefer repeating patterns, or placing more intricate designs on the flap directly.
Budgeting Tips for Envelope Liners?
An envelope liner is an upgrade in itself, but it doesn’t have to break the bank! Here are some tips!
- Some invitation designers make envelope liner templates that you can print and cut yourself! Ours are all about $5 in our envelope liner templates section on Etsy!
- You can purchase pre-made liners on many sites (including ours, shamelessly! Here’s the liner section), and assemble them yourself.
You can also have your designer design and print the liners for you, but not assemble them to save a little on cost. If you’re willing to DIY, you can always cut costs a bit!
- Of course you can use paper that you purchase with a design already on it. Most envelope liners can be made with straight cuts only, so if you deconstruct one of your envelopes and use it to draw a template, you can have your liners stack cut at Kinko’s or Office Depot for around $10. Make the liners smaller than the envelope, so they fit closely but not too tight, and have them fall below the adhesive line on the envelope flap!
- Designing and printing yourself has its own challenges, but it can save some money if you have the chops. An A7 envelope liner (for a 5×7 invitation) fits really well on a typical 8.5×11 sheet of paper. We typically use fairly thin paper, around 70 or 80# text weight paper. If you print the shape of the liner lightly on the papers, then it can make the cutting process easier.
- No matter which method you choose, we like to use this tape gun to attach them.
What Kind of Paper is Best to Use for Envelope Liners?
The best paper for envelope liners is thin, text weight paper. Using thin paper for envelope liners allows them to fold well. It also ensures your envelopes won’t be too crowded to fit your invitations, and that you won’t add much to the weight of the envelope. Adding more weight means more postage, so it’s good to keep envelope liners in thin paper.
I often recommend copy paper for printing our envelope liner templates! Otherwise, if you’re printing your envelope liners at an office supply store, they’ll have a slightly nicer paper that is still thin enough for an envelope liner.
In general, the weight of the paper should be about 80# (80 “pounds”) or lighter. I use 70-80# paper for printed envelope liners. Copy paper, by comparison, is usually about 32#. If you see “cover” weight or the word “cover” anywhere on the package, that will be too thick, even if it says 80# or less. Cover weight refers to cardstock paper, for the cover of something. Text weight refers to the internal pages of a document, book, etc.
To sum up, the best paper for envelope liners is 80# or lighter text weight paper.
Envelope Liner Sizes
What size are envelope liners? This part can be a little tricky. The main reason is that there are so many different types of envelopes, and they’re all shaped a bit differently.
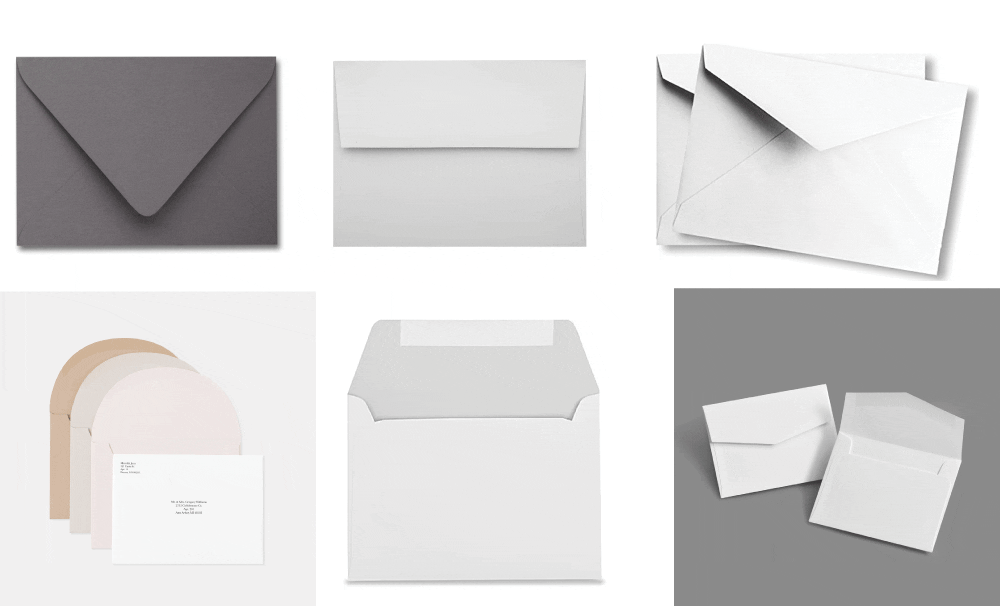
Here are some of the different flap shapes you can see for envelope liners! The top three, from left to right, are the most common: Euro/V Flap Envelopes, Square Flap Envelopes, and Baronial Flap Envelopes.

Those first two (Euro Flap and Square Flap) are the most common for wedding invitations! However, even within the general flap “type” there are different shapes for every different brand. One Euro Flap envelope may not exactly match another company’s Euro Flap envelopes. I realize it sounds confusing, so how can you establish the correct envelope liner shape and size?
If you order envelope liners from a designer, they will need to ensure that they fit your envelopes. They can often order envelopes that are made by the same company, or to the same template, as your envelope liners. For instance, our envelope liners are made to fit the colored wedding envelopes from this brand that we love!
If you’re not ordering liners from a designer, then you can usually make a template from your own envelopes. Using an extra envelope, simply follow these instructions to make a perfectly-sized envelope liner template:
- Open your envelope
- Cut the envelope about 1/2-1″ in size all the way around the edge (usually if you follow the line of the adhesive, this is a good distance)
- Trace the remaining envelope shape on your envelope liner paper
- Cut out on those lines!
- You should have a perfectly fitted envelope liner for your specific envelopes
If you’re ordering envelope liners online, such as these from Minted Weddings Marketplace, then you should just verify the dimensions as much as you can to ensure they will work in your envelopes!
How to Attach Envelope Liners
Attaching envelope liners is the fun (but maybe a bit tedious) part! There are a lot of tips in this video below that will show you in action.
Tools for Attaching Envelope Liners
- ATG Automatic Tape Glider (my favorite, high-end tool)
- Any normal tape runner from any craft store
- A glue stick
Tips for Attaching your Envelope Liners
- Break it down into smaller steps (open all the flaps at once, stuff the liners, then glue them)
- Keep your envelopes in order as you move through them
- Only glue the top portions of the liner, not the crease
- Glue as far into the point as you can
- Seal Euro Flap envelopes only 1-2″ up from the point of the flap – this will encourage guests to open them down instead of opening on the crease and tearing your liner!
We hope you’ll check out our envelope liners for some inspiration – the best thing about liners is that you can mix and match them however you like to match your unique Love Story!
We'd love to have you join us - signup for our email list to get DBL updates, stationery design tricks, business tips and more!
Ready to take the next step?
No matter what stage of business you’re in, I’m here to help you reach the next level. If you're brand new to the space, and wanting to feel it out a bit more, check out our 7 Day Invitation Design Crash Course! Ready to start your new stationery business but don't know how or where to start - our signature beginner's course From Start to Suite is perfect for you! Advanced? Join our Stationery School membership for continuing education with lessons released monthly! Or maybe you're somewhere in between - your biz is established but you struggle with knowing how to price your work effectively... check out Power in Pricing!
I came to enter into the giveaway and stumbled upon this beaut! I am experimenting with envelope liners for my next few cards and this blog was extremely helpful!
Thank you for the tips and keep rocking!
Hi, very nice website, cheers!
Need cheap hosting for just $10/year? Or VPS, where plans starts with $6/Mo?
Check here: reliable-webhosting.com